On Eclipse toolbar choose Help --> Install New Software
On "Work with:" text input, on the right, click on "Add" button.
Insert new site point:
alias: SVN
URL: http://download.eclipse.org/technology/subversive/1.1/update-site/
The url point to the latest available version(november 2013) of svn releases.
You can check the latest available going on:
http://www.eclipse.org/subversive/latest-releases.php
and checking the Latest Stable Build paragraph,
in the "Update Site:" point.
After you entered those values, you can proceed with the installation click forward button.
If you want you can avoid to install SVN sources by not-checking the flag in the components-to-install menu .
Next restart eclipse.
After eclipse will ask you to choose a connector from a list; choose and go forward and all is done.
Bye
Monday, November 25, 2013
Saturday, November 23, 2013
Debian Wheezy: you are looking for chrome? You have Chromium!!!
Chromium is the Google's open source chromium web browser.
It's included into debian repositories...
Having these repositories into the sources.list(see here), give these commands as root...
Bye....
It's included into debian repositories...
Having these repositories into the sources.list(see here), give these commands as root...
apt-get updateapt-get install chromium
Bye....
Wednesday, November 6, 2013
Debian Wheezy: change desktop resolution from command line
From command line execute xrandr
command to display a list of available resolutions.
xrandr
Screen 0: minimum 320 x 200, current 1280 x 800, maximum 8192 x 8192
LVDS1 connected 1280x800+0+0 (normal left inverted right x axis y axis) 331mm x 207mm
1280x800 59.9*+
1024x768 60.0
800x600 60.3 56.2
640x480 59.9
The * is the current selected.
xrandr -s 1024x768
for set a resolution(one from the availables)
Bye..
Wednesday, October 30, 2013
Debian Wheezy repositories
Example of a default-starting sources.list content
Bye..
deb http://http.debian.net/debian wheezy main
deb-src http://http.debian.net/debian wheezy main

deb http://http.debian.net/debian wheezy-updates main
deb-src http://http.debian.net/debian wheezy-updates main

deb http://security.debian.org/ wheezy/updates main
deb-src http://security.debian.org/ wheezy/updates main
Bye..
Monday, October 28, 2013
Debian Wheezy: resize/scale images from command line.
First of all you need to have installed imagemagick.
If no, install it from terminal as root so:
apt-get install imagemagick
Now you are ready to convert input.jpg file into output.jpg file for a 1000 pixels of width and 500 pixels of height....
convert -scale 1000x500 input.jpg output.jpg
The scale method, in this case, depends of the height and the weight of your image.
So if your image is 2 pixels of width and 1 pixels of height the perform will gone exactly.
Differently the perform will be approximated.
If you want to force the scale performing to make a image of gived dimensions...
convert -scale 1000x500! input.jpg output.jpg
If you have multiple files to convert use this:
for i in $( ls *.JPG); do convert -resize 1300x500 $i $i; done
Bye.
Wednesday, October 23, 2013
Debian Wheezy: mounting windows shared folder
First of all install cifs-utils smbclient packets, to browse and mount net folders..
So from command line:
apt-get install smbclient cifs-utils
Then you need to create a local folder to map remote folder
mkdir /home/username/example_folder
Then you can mount the remote folder by executing this:
mount -t cifs -o username=remote_pc_username //remote_pc_ip_address/remote_folder_shared_name /home/username/example_folder
Where:
remote_pc_username is the username of remote pc
remote_pc_ip_address is the remote ip address
remote_folder_shared_name is the name that the shared folder has into the local net.
Example 2:
mount -t cifs -o username=pippo //192.168.1.2/shared /home/pluto/example_folder
Terminal will prompts to you the password request....
Give it and then you will have correctly mapped your remote folder into your local example_folder
Bye..
Wednesday, October 16, 2013
Freepops under Debian Wheezy 7.0.1
Freepops is a free for use software that give you the capability to open a gateway to remote resources with pop3 protocol.
From terminal, as root, install freepops
apt-get install freepops
After, you make under /bin two files.......
The file freepopsd_start.sh contains:
#!/bin/bash
freepopsd &
And the file freepopsd_stop.sh contains:
#!/bin/bash
freepopsd -k &
Now from command line of your current user you can give those commands to startup or shutdown the "tunnel"....
Often before you run you email client...
Bye....
Linux: search a file
Simply and fast..... if you are searching a file that you have absolutely forget the path, you can run this by terminal:
locate yourfilename.txt
Important: locate use an indexed system of file research.
For mantains this system update you have to execute periodically this command from terminal....
updatedb
Bye..
locate yourfilename.txt
Important: locate use an indexed system of file research.
For mantains this system update you have to execute periodically this command from terminal....
updatedb
Bye..
Tuesday, October 8, 2013
Debian Wheezy 7.1: quick samba setup
From command line
apt-get install samba smbclient
In the sharing section add:
apt-get install samba smbclient
during installation, it performs default configuration
after....
adduser guest --home=/home/public --shell=/bin/false --disabled-password
to create a guest user to use only as samba default user...
chmod -R 0700 /home/public
chown -R guest.guest /home/public
These commands configure the sharing in way of every user can create a content(file or folder)
into the shared folder.
No one may edit the content created by someone others....
If you want some of differently, change the permission mask.....
Now edit /etc/samba/smb.conf
adding after the row obey pam restrictions = yes
insert these rows:
guest account = guest
invalid users = root
invalid users = root
and in the *Authentication* section, this row.....:
security = share
In the sharing section add:
# SHARED DIR
[shared]
comment = shared
read only = no
path = /home/public
guest ok = yes
guest only = yes
create mask = 0600
directory mask = 0700
[shared]
comment = shared
read only = no
path = /home/public
guest ok = yes
guest only = yes
create mask = 0600
directory mask = 0700
Fine...... restart samba:
/etc/init.d/samba restart
and all is done.....
Bye...
and all is done.....
Bye...
Thursday, October 3, 2013
Linux: how to check ram usage
This is quickly command to check ram available on you system...
From terminal execute:
free -k
This command extract info from the /proc/meminfo file.
So if you open this file you see a complete set of information about your system memory.
Bye..
From terminal execute:
free -k
This command extract info from the /proc/meminfo file.
So if you open this file you see a complete set of information about your system memory.
Bye..
Linux: symbolic link(shortcut) from terminal
From terminal exceute:
ln -s /full_path_whereyouwanttopoint /full_path_alias_command_name
Bye...
ln -s /full_path_whereyouwanttopoint /full_path_alias_command_name
Bye...
Tuesday, April 2, 2013
Manage mdf and mds files with Debian
Recently a downloaded a couple of files(mdf and mds) referred to a cd image.
I need now to write or mount it. In my case to write.
I use acetoneiso to manage those files.
So I get it....
apt-get install acetoneiso
After, when I launch the application, and I select the files, a popup(of the acetoneiso application) inform the it's necessary install a plug-in, puretone, to manage mdf/mds files. The plug-in is proprietary but free.
At the and of the installation, with the menubar button "Image Conversion" I convert the two files in a newer .iso file, and after I burn my cd....
Have fun...
Thursday, March 21, 2013
Debian: add iso image to sources.list file
In this post you can see how to mount an iso image file from command line.
In this other post you can see how to mount an iso image file at the system startup.
Now we can see how to insert into sources.list file the pointing to the debian distribution image file.
Go under /etc/apt
Open sources.list file and add(better if at the end of the file) this:
Now we suppose we have squeeze distribution.
If no, change the name with your distribution name.
At the end, from the command line give:
In this other post you can see how to mount an iso image file at the system startup.
Now we can see how to insert into sources.list file the pointing to the debian distribution image file.
Go under /etc/apt
Open sources.list file and add(better if at the end of the file) this:
deb file:/home/you/Desktop/debian_image squeeze main contrib
Now we suppose we have squeeze distribution.
If no, change the name with your distribution name.
At the end, from the command line give:
apt-get update
Bye...
Friday, February 22, 2013
Joomla 3.0.2: create a menu link to an other menu item
We suppose you have already create a menu item with in an article.
We need to create a menu link to this resource already existent.
The joomla element name for this is the "menu item alias"
So go where we want to create the link, suppose under top menu to link a main menu article...... But for all other needs is the same...
- From the toolbar, click on "New"
- Select the voice System Links ---> Menu Item Alias
- Fill the "Menu item title" field as you want
- Go under "Advanced Options" tab
- Choose from "Menu Item" select combo list the Menu Item(or what other resource) you want to link
- Save and close.
Have fun...
Thursday, February 21, 2013
Joomla 3.0.2: change site favicon
Ensure you have a 16x16 pixels image file. If not, resize what you have.
Convert your image in .ico image.
Rename your file to favicon.ico
Put your file under:
<joomla_root_dir>/templates/<your_template_name>/
Here you will have already a file with that name. So you overwrite it.
Now to see your new icon you need to
- reload the page(F5)
- force reloading your page (CTRL-SHIFT-R)
- clear internet tmp files
Have fun...
Wednesday, February 20, 2013
Joomla 3.0.2: changing font to your site
Go under the root foolder of your website, when you have the folders....:
- administrator
- cache
- cgi-bin
- [.....]
- [.....]
- [.....]
- templates
go under templates ---> "your-current-template-name"
in my case protpostar
go under css
and open template.css file
For example:
find the body field
and edit the font-size value for modify the most relevant points of he site.
You find all other fields here(in this file).
Bye...
Monday, February 4, 2013
OpenOffice Impress: changing template to an existing presentation
First import it:
Format --> Area --> Bitmap --> Import
choose your template...
After set to use it
Format --> Page --> Background --> Bitmap
and choose your template imported before...
Have fun...
Format --> Area --> Bitmap --> Import
choose your template...
After set to use it
Format --> Page --> Background --> Bitmap
and choose your template imported before...
Have fun...
Friday, January 25, 2013
Joomla 3.0.2 How to quickly edit current articles template
Really quickly trick....
Edit directly the follow file......
/components/com_content/views/article/tmpl/default.php
Have fun....
Edit directly the follow file......
/components/com_content/views/article/tmpl/default.php
Have fun....
Joomla 3.0.2 How to set Global Preferences for Articles
Here is explained how to set global preferences for articles in Joomla 3.0.2.
Go under:
Content --> Article Manager
Click on the Options button on the toolbar
You see all the global preferences.
Customize and save....
Have fun...
Go under:
Content --> Article Manager
Click on the Options button on the toolbar
You see all the global preferences.
Customize and save....
Have fun...
Thursday, January 24, 2013
How to set up CVS server under Debian 6.0.6, and connecting to it with Eclipse
First of all ensure you have ssh server....
If no see here....
After update repository indexes and install.....
apt-get update
apt-get install cvs
Now we see how to quickly configure it.....
create repository user and repository group
useradd repository
add user repository to repository group
usermod -a -G repository repository
add user your_user to repository group
usermod -a -G repository your_user
create root directory for cvs
mkdir /home/repository
initialize cvs
cvs -d /home/repository init
give the right permissions to folders
chown -R repository:repository /home/repository
chmod -R 770 /home/repository
chmod 770 /home/repository/CVSROOT
Now provides to give the first import as cvs administrator, so in this case, as repository user I give the follow
cvs -d /home/repository import -m "Initial import" project_name username_that_add_the_first_sources project_version
Working with Eclipse, you go under New --> Other --> CVS Repository Location
and add as parameters...
- connection type: extssh
- host: hostname or ip of the machine where you installed the cvs, in my case localhost
- username and password: the username, of system, that previously you added to the repository group and its password
- repository path: as in our example, /home/repository, that's the home directory that's you have setted for your cvs installation
Bye.....
Wednesday, January 23, 2013
OpenSSH under Debian 6.0.4
This install ssh server on your machine.
apt-get update
apt-get install ssh
Edit
/etc/ssh/ssh_config
and
/etc/ssh/sshd_config
for customize your service details.
If you want to try connection
ssh username@hostname
more info here
Bye...
What Linux version I have?
For Linux:
cat /etc/you_distribution_name_version
.....if you have Debian, for example....
cat /etc/debian_version
Bye...
cat /etc/you_distribution_name_version
.....if you have Debian, for example....
cat /etc/debian_version
Bye...
Tuesday, January 22, 2013
Joomla 3.0.2: Change Footer text - the control panel way
We see how to create a customized text footer module.
After the previous post, where you can see, three different ways to customize the footer editing the files, now we see how to obtain this result by operating on the control panel.
So...
1) go under Extensions ---> Module Manager
2) click on New button and choose, from the propted list, the voice "Customized HTML"
3)Fill the Title, the Position(Footer), and go in the Custom output tab to fill with the text you want in the footer pane.
4) Save and close
5) Select the module, clicking in the checkbox and push the Publish button.
Reload and see...
Bye
Joomla 3.0.2: Customize your Footer - Change the Footer content - The file editing modes
We have differently ways to modify your footer.
We try to explain someone of these.
The first one, the favourite for the Joomla developers, is to modify the language content files.
Starting form the main folder, go under language/it-IT/ subfolders...
it-IT in my case, for you choose your language.
In my case the file to change is the follow:
it-IT.mod_footer.ini
It contains some couples of key/value.
Well, you can change here directly the valueas you prefer.
Remember that if you leaves blank a value(mantaining the key=) the row, or the data correspoinding of will show blank.
The second way we have to modify the footer is to edit directly the php file.
In this first case directly the index.php under main folder.
Otherwise, if you have a footer added, as explained in post, you can go under /modules/mod_footer and edit mod_footer.php as you prefer.
In base of your target choose the way you prefer.
Remember always to do a backup before and after you edit.
All the three ways are not permanent.
So at your next Joomla version update, you will loose the data editeds.
Bye...
Joomla 3.0.2: Create a new Footer module
Here the simply steps to add a new footer module to your site, powered with the latest version of Joomla(3.0.2).....
1) Go under Extensions ---> Module Manager
2) Click on "New" to create a New Module
3) Choose Footer from the listed modules
4) A form will show to you.... Fill the Title and the Position fields(for this last choose "Footer" value)
5) The other fields are optional.
6) Click on Save and Close
7) Now search the module you have just created.
8) Select it clicking on the checkbox, and click on the "Publish" button.
Reload your home page and look your new footer module......
P.S.: look for how to customize your footer, by the edit files way
P.P.S.: and also here for customize the footer by joomla control panel
Bye....
Thursday, January 10, 2013
Joomla 3.0.2 - Defining home page
Joomla does not operates with pages.
We can say that it operates with View.
View on an article(for example).
So you can define the first article you want to display.
Go under Menus --> Main Menu --> Home
and choose what you want to display as first.
Bye....
We can say that it operates with View.
View on an article(for example).
So you can define the first article you want to display.
Go under Menus --> Main Menu --> Home
and choose what you want to display as first.
Bye....
Tuesday, January 8, 2013
Joomla 3.0.2 - Magic Quotes Gpc Off problem...
Should happen that after unzipped your joomla installing package, pointing on index.php default page, it notified that you have some values not correctly setted.
In this case I have the Magic Quotes Gpc Off as image(italian installation).
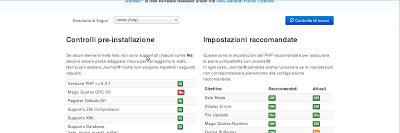 This problem may happen in locale configuration or in remote on your hosting provider.
And it depends on php settings.
To solve this problem I create under installation folder the php.ini file and I paste these two lines:
magic_quotes_gpc = Off
session.save_path = "/tmp"
Reload the joomla current page and you will continue with your setup process....
Bye....
In this case I have the Magic Quotes Gpc Off as image(italian installation).

And it depends on php settings.
To solve this problem I create under installation folder the php.ini file and I paste these two lines:
magic_quotes_gpc = Off
session.save_path = "/tmp"
Reload the joomla current page and you will continue with your setup process....
Bye....
Subscribe to:
Posts (Atom)